Simply The Best - Complete Your Order Today!
Call: (702) 400-1288 / For Custom Quote e-Mail: info@myteksupport.com
NIC Configurator 2026 is a powerful software tool that simplifies the management of network adapter advanced settings across multiple computers from a central server console. It’s a great way to maintain consistent network configurations across your systems! With it, you can configure and monitor settings such as DNS, Wake on Lan, Speed and Duplex, TCP Offloads, and more. The tool also monitors connection status, ensures compliance with network adapter policies and automatically adjusts settings when needed. NIC Configurator 2026 can monitor and modify thousands of network adapters from a central console (10k, 20k, 30k) but is recommended to monitor up to 10,000 network adapters per NIC Configurator 2026 Compliance Monitor console. |
New Compliance Monitor
NIC Configurator 2026 |
||||||||||||||||
|
||||||||||||||||
|
To install NIC Configurator 2026, download the NICConfigurator2026.zip file, extract and run the NICConfigurator2026.exe file then follow the instructions below:. Note: After downloading the zip file, you must unblock it before extracting its content. Simply right-click the zip file, click Properties, click the checkbox to unblock the file (as shown below), and then click Apply and OK.
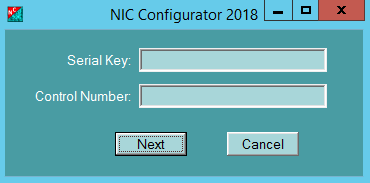
When prompted, type in your serial key and control number that came with your CD purchase. These codes were also sent to you via e-mail after your online purchase. Follow the instructions on-screen while the installation program installs into your default system Before using NIC Configurator 2026, please follow the instructions below to allow NIC Configurator 2026 to find computers on your domains, install the NIC Configurator 2026 client, and to modify client network adapters based on your NIC Policy contents. To begin, modify the Startup Type to Automatic for the Remote Registry service, enable Remote Administration service, and allow ICMP exceptions. This should be done for all computers by modifying Active Directory Group Policy at the domain organizational level. The following are instructions on how to perform this task. Group Policy Object Creation (GPO) Instructions
Verify that the Windows Defender Firewall is enabling these rules on computers in your environment to ensure that NIC Configurator 2026 is able to query and modify remote computers successfully. Some computers may require forcing group policy updates and others may require a reboot. Even though Group Policy has been configured to set the Remote Registry service for your domain computers to Automatic, some computers affected by this change may not have those services started until they have been rebooted. Use Group Policy to Add NIC Configurator 2026 Custom Group as Local Administrator (PURCHASED VERSION ONLY) If you chose to enter a custom NIC Configurator 2026 group when setting up the server, you can follow the instructions in this section to add the group as local administrator on computers managed by NIC Configurator 2026 console. In Group Policy Management:
Using NIC Configurator 2026 When using NIC Configurator 2026, login to your computer as domain\administrator or login as a user with domain admin rights for the local domain.
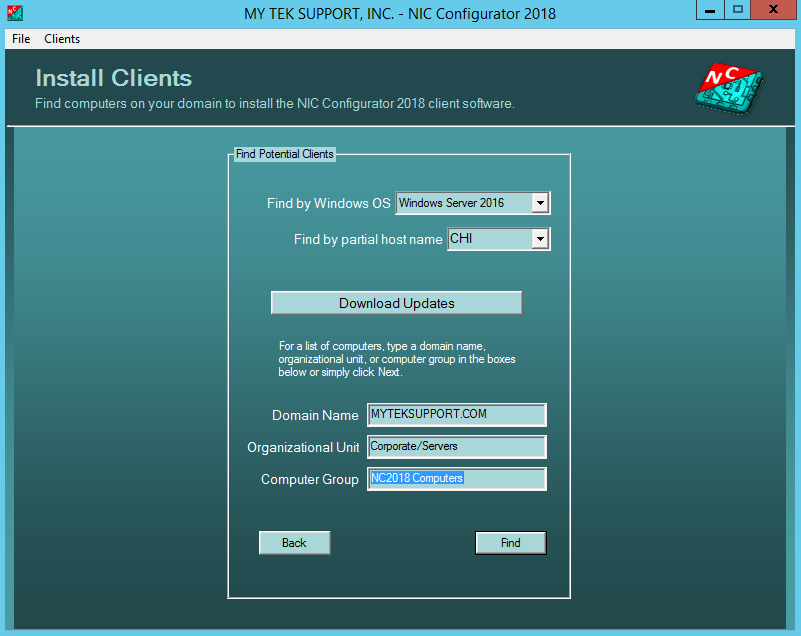
Client Installation First you must find Active Directory computers to install the NIC Configurator 2026 client. From the opening dialog box, click Clients > Install from the menu bar. The Install Clients dialog box pictured to the left will appear on your screen: Optionally, type your Domain Name, Organizational Unit, or Computer Group in the format as listed in the example below:
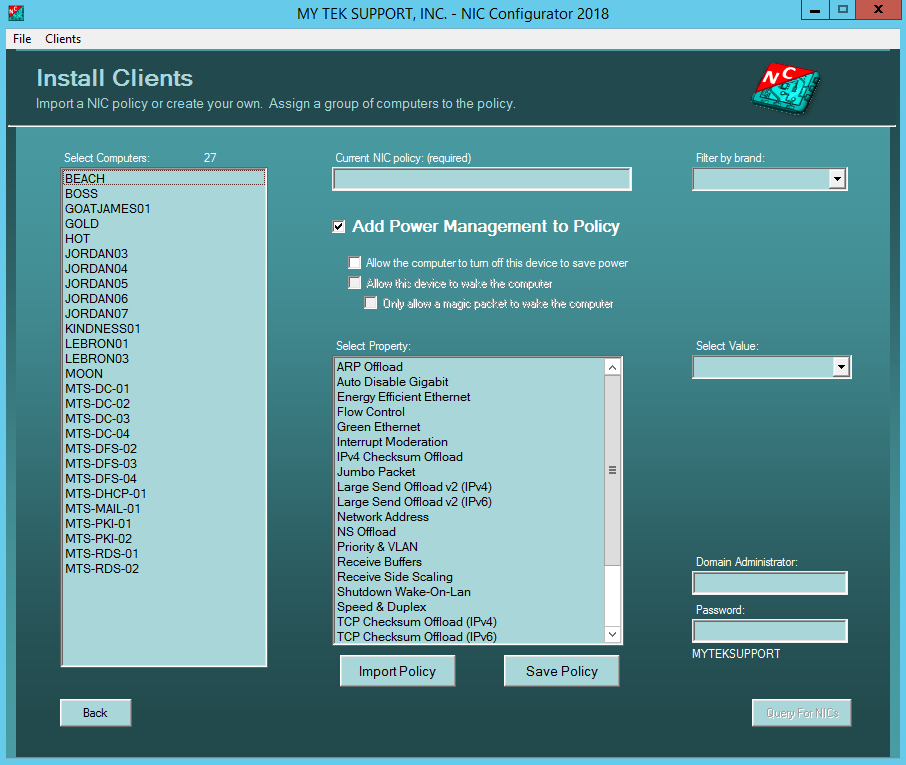
NIC Configurator 2026 works across firewalls, multiple domains, and multiple forests, as long as the appropriate trusts and permissions are in place, and your firewall ports are configured as displayed in this documentation. To display a smaller group of computers or a single computer, type the first few characters of the computer name or the full computer name in the host name filter box. For example, to display only active directory computers that begin with the letters "chi", such as "chi-mx-01" and "chi-dba-01", type "chi" in this box and then click Next. Select the dropdown for a list of Windows operating systems to choose from. Filtering by Operating System will only display computers hosting the selected Windows operating system. To only list members of a particular computer group, fill in the Domain Name entry box, clear the Organizational Unit entry box and type a group name in the Computer Group box, and then click Next. To only list members of a computer group that reside within a specific Organizational Unit, fill in the Organizational Unit and the Computer Group name entry boxes. Click Next to continue Client Installation. Import a NIC Policy or create your own Import a NIC policy to continue to the next dialog box. You can import an existing NIC policy or you can configure network adapter advanced settings and save those settings as a new NIC policy, go back into Import Policy and import the policy you just saved. To save a NIC Policy, select a NIC Property and configure a value for that property. Do this for each property you wish to add to your new NIC policy and then click the Save Policy button. Clicking the Save Policy button displays the NIC Configurator 2026 - Save Policy dialog box. This dialog box allows you to view the contents of your new NIC Policy before you give it a name and save it. At the "Save NIC policy as:" edit box, type in a name for your policy and then click Save. If you wish to use this policy click the Import Policy button, select your new policy from the dropdown box, and then click Import. You can now select computers so that NIC Configurator 2026 can find network adapters and give you the option of assigning selected network adapters to the policy you just imported. Type in your domain administrator username and password, then click the Query for NICs button. Select a group of network adapters and assign them to the imported NIC Policy Here, you can select specific network adapters and assign them to the NIC Policy listed on this dialog box. You can also chose to have NIC Configurator 2026 self-manage these adaptors performance settings by selecting “Modify Once you've assigned network adapters to the Imported NIC policy, you can click the “Install client on these computers” button. Client installation will begin on the selected computers and your NIC policy assignments will be set for installation. Once installation has been completed, the NIC Configurator 2026 opening dialog box appears. You can now view NIC Compliance Monitor by clicking the Clients > Monitor > NIC Compliance menu items.
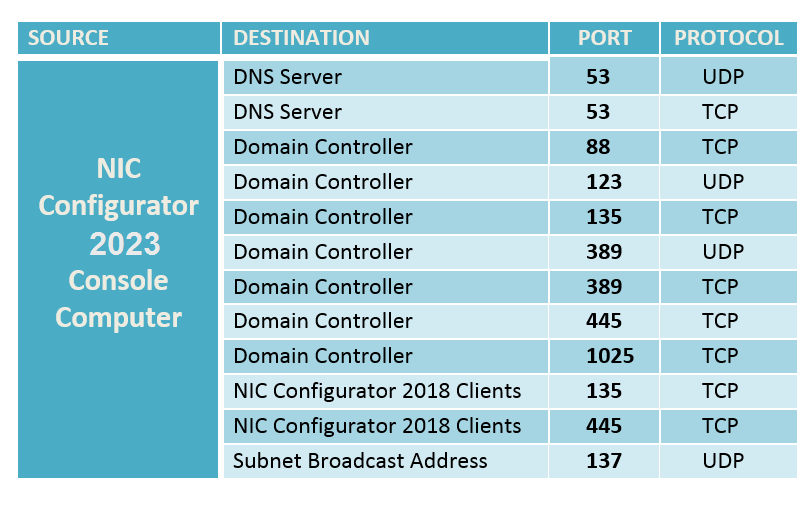
Firewall Service Ports If there is a firewall between NIC Configurator 2026 and the computers managed by NIC Configurator 2026 (clients), the below ports must be opened on the firewall. NIC Configurator 2026 uses the below service ports to connect to computers in your network.
Local Security Policy Rights and Permissions This section is included in the Purchased version only and omitted here for security reasons. System administrators in large enterprise organizations may need to understand the granular rights and permissions on the server and client and that information is provided when a purchase is made as the documentation in MS Word and PDF form are exported from the NICConfigurator2026.exe setup file.
NIC Configurator 2026 Updates To read the latest updates and fixes to NIC Configurator 2026, visit: https://www.nicconfigurator.com/updates_fixes.html To download the latest Trial Version of NIC Configurator 2026, visit: https://www.nicconfigurator.com/download.php
To Remove NIC Configurator 2026 Clients From the NIC Configurator 2026 opening dialog, click the Clients menu item, and then click Remove. Fill in the fields on this dialog page to search for computers that have the NIC Configurator 2026 client installed and click the Find button. When the computer list is returned, select computers where you want to remove the NIC Configurator 2026 client and click the Assign button. Click the Remove Client Software button. The clients will be scheduled for immediate removal. Once the Opening Dialog box appears again, you can go into Compliance Monitor or Flow Control Monitor and watch the data from clients begin to remove from the monitor. Once all computer listings are removed from the monitors, you can close out of all NIC Configurator 2026 dialog boxes. You can also uninstall the NIC Configurator 2026 client by going into Programs and Features directly on the client. To Remove NIC Configurator 2026 from your computer You will now need to go to Control Panel to uninstall the main NIC Configurator 2026 software from your computer. Operating Systems NIC Configurator 2026 can be installed on and can change network adapter settings on computers using the following operating systems:
This product is for Windows enterprise environments where computers are part of an Active Directory forest/domain. NIC Configurator 2026 will only work on computers that are part of a Windows Active Directory domain.
|
|||||||||||||||
|
|
||||||||||||||||

 programs directory. The setup program will install a NIC Configurator 2026 icon on your desktop toward the end of installation.